
Testing your webcam before a video call can save you from embarrassing technical issues. Whether you're using an online tool, your operating system, or a video conferencing app, it only takes a few minutes to ensure everything is working properly. Here's a quick summary of how to test your webcam:
- Use Online Tools: Websites like VEED.io and webcammictest.com let you check your webcam instantly without downloads.
- On Windows: Open the built-in Camera app and check the live video feed.
- On macOS: Use Photo Booth to preview your camera and record test clips.
- In Apps: Platforms like Zoom and Microsoft Teams offer preview features to confirm your setup.
If your webcam isn't working, check privacy settings, update drivers, or ensure the camera is properly connected. Simple steps like these can help you avoid last-minute glitches and focus on your meeting.
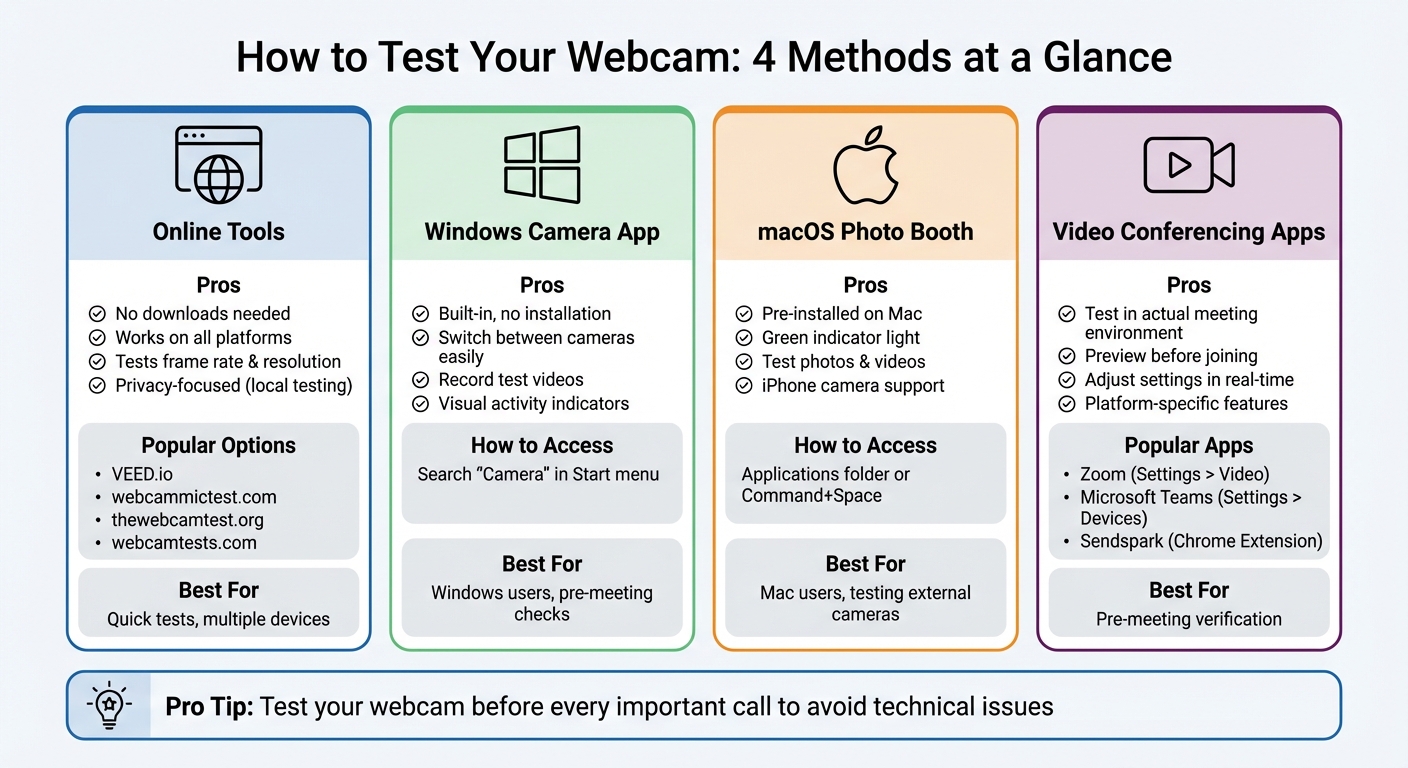
Quick Guide to Testing Your Webcam: 4 Methods Compared
How to Test your Webcam
Use Online Webcam Test Tools
Browser-based tools make it easy to test your webcam instantly - no downloads required. These tools rely on your browser's media API to access your webcam locally. That means your video stays on your device and isn’t recorded, stored, or sent to a server.
"Your video never leaves your device. The entire test runs in your browser. Nothing is recorded, stored, or transmitted to our server." – thewebcamtest.org
These online tools complement the system checks discussed later. They work on a variety of platforms, including Windows, macOS, Linux, Android, and iOS. Many also support multiple cameras, so you can switch between an internal laptop camera and an external USB webcam with ease.
Online Webcam Test Tools to Try
Here are a few reliable tools to check your webcam before a big meeting or call:
- VEED.io: Offers a straightforward visual preview with a lighting check and includes a built-in video editor for recording if needed.
- webcammictest.com: Provides diagnostics for frame rate, noise levels, and image filters.
- thewebcamtest.org: Measures latency and bit depth, and even saves test images for review.
- webcamtests.com: Quickly identifies your webcam’s name and default resolution, with feedback from over 7,100 user reviews.
All of these tools are free, require no sign-up, and offer advanced features like testing frame rates up to 60fps and resolutions as high as 4K.
Steps to Test Your Webcam Online
- Open your browser and visit a testing site like VEED.io or thewebcamtest.org.
- Click the "Start Webcam Test" or "Check My Cam" button. Grant the browser permission to access your camera and microphone when prompted.
- Once your live feed appears, check that your image is clear and centered. Most tools will also display technical details like resolution and frame rate.
- If you have more than one camera connected, use the dropdown menu to switch between them. Some tools also let you test your microphone by speaking and monitoring the audio input levels.
- Close any apps (like Zoom or Teams) that might block your camera. If your screen stays black, double-check that any external cameras are securely connected and powered on.
For additional peace of mind, the next section will guide you through testing your webcam directly on your operating system.
Test Your Webcam on Windows and macOS
Both Windows and macOS come with built-in tools that make testing your webcam quick and easy. These apps are a handy alternative to online tests or video conferencing app checks, ensuring your camera is ready to go before any important call.
Test Your Webcam on Windows Using the Camera App
To test your webcam on Windows, start by right-clicking the Start button, then search for "Camera" and open the app. Once launched, your webcam should automatically turn on, showing a live video feed in the center of the screen. If you have more than one camera - like a built-in laptop camera and an external USB webcam - click the Change Camera icon to toggle between them.
Want to test both video and audio? Click the Video button, then hit Take video to record a short clip. You can review the recording from the thumbnail gallery to check the video quality and ensure the microphone is working.
If the screen stays black, head to Settings > Privacy & Security > Camera and make sure both Camera access and Let apps access your camera are enabled. Additionally, Windows provides a visual cue when your camera is active (if your hardware lacks a physical indicator light), and a microphone icon will appear in the taskbar when your microphone is in use.
Test Your Webcam on macOS Using Photo Booth
On macOS, open Photo Booth from the Applications folder, Launchpad, or by pressing Command + Space and typing "Photo Booth." Once the app is running, your camera will activate automatically, confirmed by the green indicator light.
To test photo functionality, click the Picture button or the Four Pictures button in the bottom-left corner, then hit the red Take Photo button. For video testing, switch to the Video option, click Record Video, and press Stop when you're done. Play back the recording to check both the video and audio quality. If you're using an external webcam or even your iPhone as a camera, you can select it from the Camera menu in the menu bar.
If the camera doesn't activate, go to System Settings > Privacy & Security > Camera and confirm that Photo Booth has permission to access your camera.
Next, we’ll dive into how to test your webcam directly within video conferencing apps.
sbb-itb-afd3f9e
Test Your Webcam in Video Conferencing Apps
Testing your webcam directly within video conferencing apps is a smart way to ensure everything works smoothly before your next meeting. Most platforms offer preview features that let you check your camera without needing to join a call. Here's how to test your webcam in some popular apps.
Test Your Webcam in Zoom

In Zoom, you can easily check your webcam setup. Click your profile picture or the gear icon, then go to Settings > Video to see a live preview of your camera. If you have multiple cameras - like a built-in laptop camera and an external USB webcam - you can use the drop-down menu under Camera to select the right one.
"You can manually test your video camera with Zoom before joining a meeting - or during a meeting - to ensure that the camera is working properly." – Zoom Support
If you’re already in a meeting, click the up arrow (^) next to the Stop Video icon and select Video Settings to access the preview. For Zoom users on a web browser, check the camera permissions by clicking the lock icon in the address bar and setting the Camera option to "Allow."
Test Your Webcam in Microsoft Teams
Microsoft Teams also makes it simple to test your camera. In the desktop app, click the three dots (…) next to your profile picture and navigate to Settings > Devices. Under the Camera section, select your preferred webcam from the drop-down menu to see a live preview.
For an even more thorough test, use the Make a test call feature, found in the same settings menu. This launches a Test Call Bot that records a short message and plays it back, so you can confirm both your camera and microphone are working. Keep in mind, this feature is only available on the desktop app for Windows and Mac - not on the web version.
Before joining a meeting, you’ll also see a pre-join screen where you can toggle the Camera switch to "On" for a quick preview. This screen lets you adjust video filters or backgrounds as needed.
For those in sales or outreach roles, Sendspark offers another great way to test your webcam.
Test Your Webcam Using Sendspark

Sendspark is a handy tool for testing your webcam while creating personalized video messages for sales or outreach. It’s available as a Google Chrome Extension or a Desktop Application. Both options provide a live preview before and during recording, so you can check your framing and lighting in real time.
To test, select Face mode, click the Settings icon to pick your preferred camera, and hit Record to capture a short test clip. The Desktop App is recommended for smoother performance and better audio-video sync, especially when recording outside the browser.
You can also use the Camera Effects tab to enhance your video with tools like the Touch Up Appearance slider or background blur for a polished, professional look. Review the test clip to confirm your video and audio are clear before your next outreach session.
Fix Common Webcam Problems
Even after confirming your webcam is functional through various tests, you might still encounter issues like a black screen, poor video quality, or apps failing to detect your camera. Fortunately, most of these problems have straightforward solutions. Here’s how you can address some of the most common webcam issues.
Check Camera Permissions and App Access
Your operating system manages which apps can access your webcam. If you're seeing a black screen or receiving an "access denied" error, the issue might lie in your privacy settings.
- On Windows: Navigate to Settings > Privacy & Security > Camera. Ensure both "Camera access" and "Let apps access your camera" are turned on.
- On macOS: Go to System Preferences > Security & Privacy > Privacy > Camera and check the boxes next to the apps you want to grant access.
If your webcam works in one app but not another, close any other programs that might be using it, including browser tabs running video chat applications. Conflicts between apps are a common cause of webcam problems.
Update Your Webcam Drivers
Outdated or faulty drivers are another frequent culprit behind webcam issues. To update your drivers:
- On Windows: Open Device Manager by searching for it in the Start menu. Expand the "Cameras" or "Imaging devices" section, right-click your webcam, and select Update driver. If your webcam doesn’t appear, click Action > Scan for hardware changes to prompt Windows to detect it.
If updating doesn’t resolve the problem, uninstall the device entirely. Right-click the webcam in Device Manager, select Uninstall device, and then unplug your external camera (or restart your computer if it’s built-in). When you reconnect the camera or reboot, Windows should automatically reinstall the drivers.
- On macOS: Make sure your system is up to date by going to System Preferences > Software Update.
Fix Hardware and Connection Problems
Sometimes the issue is as simple as a physical connection problem. For external webcams, unplug the USB cable and try a different port - preferably a USB 3.0 port for better performance. Avoid using USB hubs, as they can cause power or data transfer issues. Instead, connect the camera directly to your computer.
"USB devices, including webcams, can sometimes stop working due to glitches in the operating system or with the USB port itself." – Computer Hope
Check that the privacy shutter on your webcam is open and that the lens is clean. Many webcams have an LED light that turns on when the device is active. If the light is on but no video appears, the lens might be obstructed, or the camera could be disabled in your system settings. For built-in cameras, some laptops allow you to disable the webcam at the hardware level via the BIOS under "Integrated Devices."
Quick Reference Table
Here’s a handy table summarizing common webcam issues and their fixes:
| Problem | Quick Fix | Advanced Solution |
|---|---|---|
| Webcam not detected | Restart computer; try a different USB port | Update drivers; check BIOS settings |
| Black screen / No video | Check privacy shutter; close other apps | Reinstall drivers; check antivirus settings |
| Access denied | Enable webcam access in OS settings | Reset camera privacy settings; check app permissions |
| Poor video quality | Clean lens; improve lighting | Update graphics drivers; adjust resolution |
Conclusion
Running regular webcam tests can help you avoid awkward disruptions during important video calls, interviews, or virtual meetings. Whether you rely on online tools, built-in apps like the Windows Camera app or macOS Photo Booth, or the preview features in platforms like Zoom and Microsoft Teams, these quick checks ensure your camera is ready to go.
"A big part of video conferencing etiquette is making sure your equipment works before your meeting starts." - Digital Trends
Taking just a few minutes to test your webcam can save you from surprises like a closed privacy shutter, an unexpected background, or last-minute technical glitches. Plus, it gives you time to resolve issues like permissions, driver updates, or USB connection problems without the stress of being in a live meeting.
The methods shared here work for both built-in laptop cameras and external USB webcams, so you can pick the one that suits your setup. A quick test before every call helps you stay prepared, confident, and professional.
FAQs
Why is my webcam showing a black screen, and how can I fix it?
If your webcam is showing a black screen, try these steps to fix the issue:
- Check the basics: Make sure the webcam is properly connected, the lens is clean, and any privacy covers are open. Sometimes, the simplest things can be the root of the problem.
- Close other apps: Ensure no other programs are using the webcam. When multiple apps try to access the camera at the same time, conflicts can occur.
- Restart your device: A quick reboot can often clear up temporary glitches that may affect the webcam.
- Update your drivers: Outdated or faulty drivers are a common cause of webcam problems. Open your device manager to check for updates or reinstall the driver to ensure it’s functioning properly.
- Test the webcam: Open your computer’s built-in Camera app to see if the webcam is working. If it’s still not showing anything, double-check your privacy settings to confirm that apps have permission to access the camera.
These steps should help you address most black screen problems with your webcam.
What can I do if my webcam isn’t being detected by any apps?
If your webcam isn’t working with any applications, here are some steps to help you figure out what’s wrong:
- Check the connection: Make sure the webcam is securely plugged in and powered on. If it’s an external webcam, unplug it and reconnect it to ensure a proper connection.
- See if your computer detects it: On a Windows system, open Device Manager and look under Cameras or Imaging Devices. If you don’t see it listed, your computer may not be recognizing the webcam.
- Update or reinstall drivers: Head to the manufacturer’s website to download the latest drivers for your webcam. Alternatively, you can try updating or reinstalling the drivers directly through Device Manager.
- Check privacy settings: Navigate to Settings > Privacy > Camera and verify that camera access is enabled for both your device and the apps that need it.
- Test in a different app: Open the built-in Camera app or try another program to determine if the issue is limited to one specific application.
If none of these steps work, the problem could be a hardware issue or even a compatibility problem. To confirm, test the webcam on another computer or consider replacing it.
Are online webcam test tools safe to use?
Using online webcam test tools comes with privacy risks, including the chance of someone gaining unauthorized access to your camera, collecting your data, or misusing your video footage. That's why it's crucial to stick to tools from reputable sources that clearly outline their data practices and ensure your information isn't stored or shared without your permission.
To keep your privacy intact, choose tools that openly share their data usage policies, avoid granting permissions that aren't absolutely necessary, and make sure to close any apps or browser tabs that access your webcam once you're finished.


