
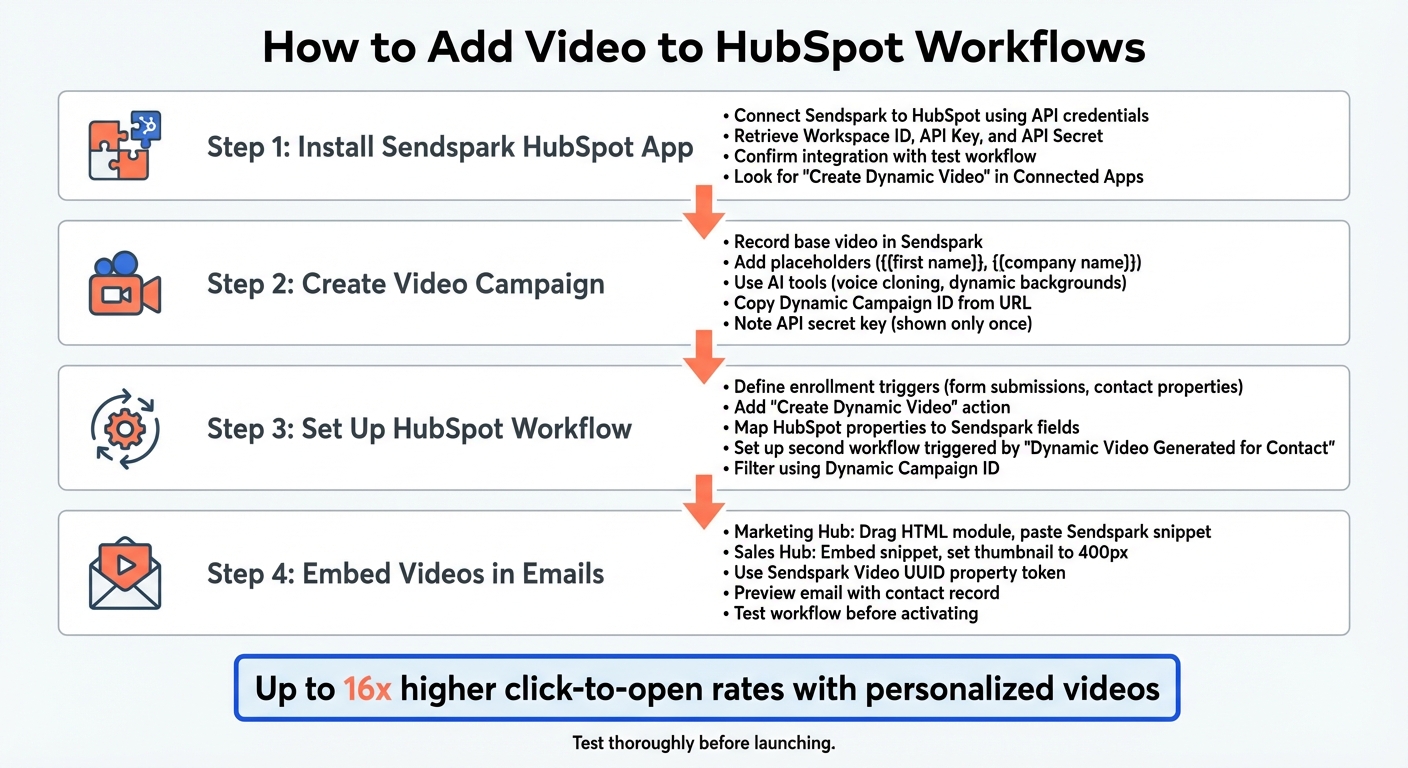
Adding personalized video to HubSpot workflows is a powerful way to boost email engagement and conversions. By integrating Sendspark with HubSpot, you can automate the creation and delivery of AI-personalized videos tailored to each recipient. Here's the process in four steps:
- Install Sendspark HubSpot App: Connect Sendspark to HubSpot using API credentials and confirm integration with a test workflow.
- Create a Video Campaign: Record a base video in Sendspark, use placeholders (e.g.,
), and note your Dynamic Campaign ID for workflow setup. - Set Up HubSpot Workflow: Define triggers (e.g., form submissions), configure Sendspark actions, and map HubSpot contact properties to personalize videos.
- Embed Videos in Emails: Add Sendspark video snippets to HubSpot email templates, ensuring proper display and personalization.
Test workflows thoroughly before launching, monitor engagement metrics like video views and click-through rates, and make adjustments based on performance. Personalized videos can lead to up to 16x higher click-to-open rates and significantly more replies, making it an effective tool for sales and marketing teams. For a complete playbook, see our guide to sales automation in CRM.
4-Step Process to Add Video to HubSpot Workflows
What You Need Before Getting Started
Before diving into video automation with HubSpot, it's essential to have your accounts, permissions, and configurations ready. This preparation ensures a smoother experience when integrating personalized videos into your workflows.
Active Sendspark and HubSpot Accounts
Make sure both your Sendspark account (with CRM integration) and the corresponding HubSpot module are active. Depending on your goals, you can use Marketing Hub for automated outreach or Sales Hub for video-enhanced sales sequences. To get started, install the Sendspark HubSpot App from the HubSpot Marketplace. This app enables dynamic video actions and auto-configures necessary properties for integration. Additionally, the Sendspark Chrome Extension lets you record videos directly within HubSpot.
Custom Properties in HubSpot
After installing the Sendspark HubSpot App, HubSpot will automatically add key properties like "Dynamic Video Generated for Contact" and "Dynamic Campaign Id". These properties are crucial for triggering workflows and tracking contacts who receive personalized videos. To make the most of AI personalization tokens in your videos, ensure your HubSpot contact records include standard fields such as First Name, Email, Company Name, Job Title, and Website URL. Keep in mind that "Company" must be stored as a contact-level variable in HubSpot, not as a company-level variable, for proper integration.
CRM and Workflow Permissions
To set up integrations and automated workflows in HubSpot, you’ll need Admin permissions. These permissions are essential for accessing workflow features, especially for Sales Sequences involving AI video generation. You’ll also need access to your Sendspark API credentials page to retrieve your Workspace ID, API Key, and API Secret. When launching a new campaign, generate and copy each team member's unique secret key.
Once your accounts are active and permissions are in place, your HubSpot setup will be ready to seamlessly incorporate personalized video into your workflows.
How to Add Video to HubSpot Workflows
Once you’ve got the right accounts and permissions set up, you can start adding personalized videos directly into your HubSpot workflows. The process involves connecting Sendspark to HubSpot, creating a video campaign, setting up workflow triggers, and embedding the video in your email templates.
Step 1: Install the Sendspark HubSpot App
First, head to the Sendspark Integration settings and connect the HubSpot App. You’ll need your Sendspark Workspace ID, API Key, and API Secret, which you can find on the Sendspark API credentials page. To confirm the integration, create a test workflow. If you see "Create Dynamic Video" in the Connected Apps section and Sendspark properties like "Dynamic Video Generated for Contact", you’re good to go.
Step 2: Create a Personalized Video Campaign in Sendspark
Start by recording your base video in Sendspark. Use AI tools like voice cloning and dynamic backgrounds to enhance it. Add placeholders like or to indicate where personalization will be applied. Once your video is ready, copy the Dynamic Campaign ID from the URL and take note of the API secret key - it’s only displayed once. Later, when setting up the workflow action, check the "I authorize to buy additional DVMs" box to ensure your automation doesn’t stop if you go over your monthly dynamic video minute limit.
Step 3: Set Up Your HubSpot Workflow and Configure the Webhook
Now, create a new workflow in HubSpot and define the enrollment triggers, like form submissions or changes to contact properties. Add the "Create Dynamic Video" action from the Connected Apps section and input your Sendspark credentials. Map HubSpot properties - such as First Name, Email, Company Name, Job Title, and Website URL - to the corresponding Sendspark fields. Then, set up a second workflow triggered by "Sendspark: Dynamic Video Generated for Contact" and filter it using your specific Dynamic Campaign ID.
Step 4: Add Videos to Your HubSpot Email Templates
For HubSpot Marketing Hub, drag an HTML module into your email template and paste the Sendspark "HubSpot Marketing Hub" snippet into the code block. If you’re using Sales Hub or Sequences, embed the snippet into your email template and set the thumbnail size to 400px. The Sendspark Video UUID property token ensures each contact gets their personalized AI-generated video. Always preview your email using a specific contact record to make sure the dynamic videos and personalization tokens display correctly before activating the workflow. Once everything looks good, test the workflow to ensure smooth delivery.
Testing and Monitoring Your Video Workflow
Before launching your video workflow, take the time to test it thoroughly. HubSpot's built-in "Test [object]" feature is a great starting point. It allows you to verify whether a specific contact meets the enrollment criteria. A green panel means everything checks out, while a red panel indicates an issue that needs attention. Additionally, you can simulate the workflow to preview each step, complete with timestamps, to ensure everything flows as intended.
For email-related actions, use the "Send preview" option in the test panel. This sends the email to your address (not the contact's), so you can confirm the video displays correctly. If you're using HubSpot Enterprise, you might want to run these tests in a sandbox environment. This helps protect your live data during testing, though you'll need to manually connect integrations in the sandbox accounts. Be sure to conduct these tests with sample contacts to avoid surprises.
Test with Sample Contacts
Start testing by using a form submission as your trigger - it’s easy to set up and manually activate for testing purposes. Run a few sample contacts through the workflow to ensure everything works as expected. Pay special attention to the "Dynamic Video Generated for Contact" property. This property confirms that the AI video has been fully created before the email is sent. Think of it as a checkpoint to ensure the automation doesn't move forward prematurely.
Publish and Activate Your Workflow
Once your tests run smoothly, publish the workflow to kick off your automated video outreach. After activation, keep a close eye on the first batch of enrollments. This is your chance to catch any edge cases or data mapping issues that might not have surfaced during testing.
Track Video Engagement in HubSpot
After confirming the workflow is running as planned, shift your focus to monitoring video engagement metrics for actionable insights. To track engagement directly on contact timelines, add your HubSpot tracking code to Sendspark settings. This integration logs key events - like video plays, watch time, and CTA clicks - as activities in HubSpot.
"Emails with personalized video can see up to 16x higher click-to-open rates and 4.5x higher in unique click-throughs compared to non-personalized content" – Bethany Stachenfeld, Co-founder of Sendspark
Sendspark's heatmaps provide a visual way to spot where viewers drop off. If you notice consistent drop-offs at a specific timestamp, consider either shortening the video or moving your call-to-action earlier in the content. You can also enable real-time alerts to get notified the moment a prospect plays the video, giving you the opportunity to follow up while their interest is fresh.
sbb-itb-afd3f9e
Benefits of Using Sendspark with HubSpot Workflows
With your integrated setup in place, here’s how adding video can enhance your sales outreach and make it more effective.
Personalization at Scale
Imagine recording a single video and letting AI handle the rest. Sendspark’s AI-powered voice cloning can say each prospect’s name naturally, while dynamic backgrounds update with details like the recipient’s website. This creates the impression that every video is custom-made for each individual. The magic? All personalized details are pulled directly from HubSpot records, saving you time while keeping things personal.
Higher Engagement and Conversion Rates
Personalized videos aren’t just a nice touch - they’re a game-changer. They can increase email engagement by up to 16 times and generate 400 times more replies compared to plain text emails.
"Our email engagement is 3x higher when we send video 'sparks.' Love Sendspark."
– Emilia Korczynska, Head of Marketing
By combining AI personalization with automated delivery through HubSpot workflows, you can keep engagement high without compromising on scale. Videos play directly within Apple Mail and Superhuman, while Gmail and Outlook users see a high-quality fallback image that links to the video in their browser. These thoughtful touches not only drive better engagement but also ensure a smoother integration with your CRM.
Native Integration with HubSpot
Sendspark works seamlessly with HubSpot, fitting right into your existing CRM setup. You can trigger videos based on specific HubSpot events, like new contact creation, form submissions, or scheduled meetings. Plus, video view data and heatmaps sync back to the HubSpot contact timeline, giving your sales team real-time insights into how prospects are interacting with the content.
Want to take it a step further? The "Dynamic Video Generated for Contact" property can act as an enrollment trigger, ensuring emails are sent only after the personalized video is ready. This keeps all your engagement data centralized and ensures your workflows are running smoothly.
Conclusion
Adding video to your HubSpot workflows is a straightforward process broken into four steps: install the Sendspark HubSpot App, create a personalized video campaign, set up a webhook-triggered workflow, and embed videos into your email templates. Once everything is in place, your workflows will automatically generate personalized videos whenever contacts take specific actions - like submitting forms, booking meetings, or moving through your sales pipeline.
Teams leveraging AI-personalized video automation report impressive results: 2–3x more replies and a 4.5x boost in unique click-through rates. These numbers translate directly into more conversations and closed deals, giving your sales efforts a measurable edge.
Sendspark’s integration with HubSpot takes it a step further by syncing all video engagement data back to the contact timeline. This centralizes essential insights in your CRM, helping sales reps focus on the leads that show the most interest. With these tools, your team is equipped to act quickly and effectively.
You can get started with a 7-day free trial of the HubSpot integration. Try setting up a test workflow triggered by form submissions, and use the pay-as-you-go option to seamlessly continue when you exceed your monthly video minute limit.
FAQs
How can I make sure my personalized videos display properly in emails?
To make sure your personalized videos appear correctly in emails, take advantage of Sendspark's integration with HubSpot. This setup allows you to embed dynamic videos effortlessly into your email templates while ensuring each recipient sees content tailored specifically to them.
Here’s how it works: create your video in Sendspark using placeholders like , then drop it directly into your HubSpot email template.
To avoid any hiccups, use merge tags along with fallback variables to manage missing recipient data. Hosting your videos on Sendspark ensures they load smoothly and keeps your email outreach engaging and effective.
What are the benefits of integrating Sendspark with HubSpot?
Integrating Sendspark with HubSpot opens up new possibilities for your outreach by incorporating personalized videos into your strategy. These videos can help grab attention and improve engagement and response rates. Sendspark makes it easy to scale this personalization by adding recipient-specific details - like their name or even custom backgrounds - directly into your videos.
On top of that, Sendspark offers detailed video analytics to track how viewers interact with your content. You can monitor metrics like watch time and clicks, giving you valuable insights to fine-tune your campaigns. This data-driven approach ensures your outreach efforts are more targeted and effective.
How can I monitor video engagement in HubSpot?
You can track how viewers interact with your videos in HubSpot using Sendspark's analytics tools. These features let you dive into details like viewer activity, heatmaps showing where viewers lose interest, and alerts when someone plays your video. Plus, you can analyze overall performance to gauge how well your content connects with your audience.
By connecting Sendspark with HubSpot, you can automatically sync these insights with your CRM data. This integration makes it easier to refine your strategies and boost engagement effectively.


